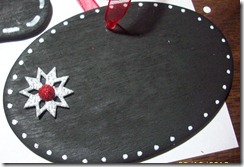
Sorry for so many posts at one time….but I am finally catching up on posting some of the projects I completed in December. I made these lil chalkboard tags or you can even use them as ornaments for my co-workers this year. I found my inspiration on Pinterest and they were super easy. I bought some wood pieces and the spray chalk paint at Michaels. I do recommend you looking for pieces that either don’t have a tag stuck on the back, it was very difficult to remove that tag. I spray painted both sides. Then I used a white paint marker to decorate the tag and put a personal msg on the back. Once all that was dry I added some red ribbon I already had along with some snowflake stickers and bling. Love them!!!
Thursday, December 27, 2012
Bottle Cap Necklaces
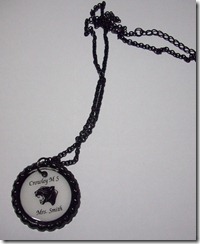
I finally made these!!! I have been wanting to try to make these and I thought it was going to be so difficult but it really wasn’t. I used already painted black bottle caps from Hobby Lobby, Tim Holtz jump rings, Mod Podge Dimensional Magic, Martha Stewart circle punch and my own clipart. After the Dimensional Magic dried I punched a hole with my Crop a Dile and added the jump ring along with a chain I also bought at Hobby Lobby. I really liked the finished product.
Christmas Ornament Frame
This is the gift I made for our Stampin Up Christmas gift exchange. I used the ornament punch, the current Christmas paper pack from SU and several holiday greeting stamps from SU, gumball green paper SU, gold embossing powder SU and gumball green ribbon satin stitched SU. This was pretty simple to do…I took a plain canvas painted it with a light solid color, punched out ornaments from a gold paper, punched out ornaments from the SU paper pack then I put it all together. I have a separate piece of paper for the bottom part which I embossed before adhering it to the canvas. I then added ribbon and the bow. Thanks for stopping by.
Wednesday, December 26, 2012
Birthday Cards
Saturday, December 8, 2012
Office Wall Art
I took an old cheap canvas that had a painting on it that I really didn’t care for and turned it into my own wall art. I have a large empty wall space in my office and decided to deco some paper and add a key cut out of vinyl. I really like it! It was a real inexpensive way to decorate. I added a few elements that I truly love in life, like the bird, hearts, yellow roses, being a Texan, Hope, balloons, and the key. I can’t wait to hang it up on Monday!
Sunday, October 28, 2012
Finally completed some vacation pages
Tuesday, June 19, 2012
Graduation Card
I made this graduation card for my cousin Tim....I couldn't post it before because I didn't want it to be seen until after the party. I really had a fun time making this card and I think it was well received. Of course, I used my Cricut and I made sure to make a money pocket right behind the ribbon award under "Best Wishes". I will soon be on vacation so I hope to catch up on some challenges, projects and fun cards.
Wednesday, May 23, 2012
Party Invites
 I created these party invitations for a friend's daughter. She wanted to have an end of school year pool party and I am glad that I was able to make these for her. I used the Life's A Beach Cricut cart. I especially love the bikini cut! It is soooo cute!
Monday, May 21, 2012
Mother's Day Card
 I created this teapot card for my mom for Mother's Day. I used my Cricut Nursery Rhymes cart in the cricut craft room. The best thing I love about this card is the flowers I made. I have really enjoyed researching many several tutorials for flowers and so now I know I will never buy flowers again....I will just make them. I apologize for the poor photo quality but I can't retake the pics cuz I already mailed the card. You really can't see the lil yellow rosebud I have on the other side but I also made that and sparkled it a bit. Thanks for stopping by. Feel free to leave any questions or comments in the comment section.
CSI Casefile #20 - Bust A Cap
Wednesday, May 16, 2012
CSI Case#18

50th Birthday Card (male)
Wednesday, March 28, 2012
I didn't get it....
Thursday, March 22, 2012
Time to get back into the groove...
Saturday, March 10, 2012
CSI case 9 - My Definition of Nebula
Sunday, March 4, 2012
Elvis - Case 8 @ CSI
http://csicolorstoriesinspiration.ning.com/profile/JanninaJohnson


